


Action > Nintendo > Clash At Demonhead > Speed Walkthrough
Posted: February 14th, 2006
Last Updated: February 14th, 2006
This is my speed walkthrough. It is a fairly brief guide to everything you need to do to beat the game, and nothing that you don't need to do trying all the while to do it as fast as possible. I may add some other information to this section in the future. It's basically a summary of which routes you need to take, and some brief comments on some routes.
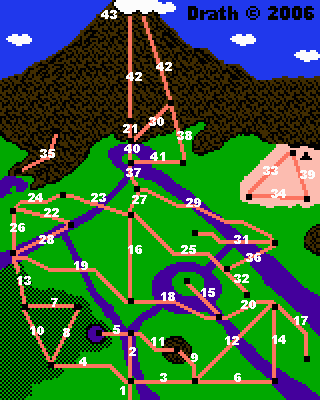
Use this map to follow along if you don't know the route numbers.
General Notes
Make sure you kill as many monsters as possible if not all of them on each stage. This will ensure you the best results with money/health/force gain. You may also choose to spend extra money on things like Power Boots or Jet Packs to improve your speed even more. Get all easily accessible gold that you find along the way. If you ever come across one of the flying puppy-dog-like things that drop items, make sure you keep shooting him, every couple shots he will drop some money.Route Progression: 1 - 3 - 9
Route 3: This is the first route with water. To get through water areas faster just jump as soon as you hit the water, you should be able to continue to jumping on the water, never actually entering it.
Route 9: This is the first route with a climbable wall. To get up these walls faster make sure you jump on the wall instead of climbing from the absolute bottom.
Route Progression: 11 - 9 - 12 - 17 -14 - 6 - 35 - 7 - 20 - 15 - 18 - 19 - 28 - 22 - 16 - 27 - 37
Route 11: Your first boss bottle is in this stage and your first medallion.
Route 12: Stay out of the water if possible.
Route 17: It's probably a good idea to buy power boots for the center part of this route to jump on the platforms easier. After talking to the sprite Faysha just fall into the hole and exit the level that way, it is much faster.
Route 14: It's not necessary to get the package that drops on this route.
Route 6: As soon as you enter this stage from route 14 drop directly down both waterfalls and enter the statue bringing you to route 35.
Route 35: You will need to use your micro force power that you just learned from the Hermit to get under the mountain. You will exit into the large hole, climb to the top. Once you reach the top buy/equip Power Boots and jump on the right ledge.
Route 7: Second boss battle/medallion. After the boss battle hopefully you will already have the Teleport force power. If you do make sure you have enough force to use it, if not go in the shop and buy some Dayna Punch. Teleport to the cross section of routes 20, 12, 14 and 17, and enter route 20.
Route 15: After talking to Micheal you are done here for now, go back the way you came.
Route 28: Buy an Aqua Lung (or 2 depending how fast you are with the boss). The boss is located near the very right of the lake when you swim down.
Route 22: You don't have to pick up the package in this route either if you don't want to. Make sure to exchange your gold while you are here. Teleport to the cross section of 19, 16, 18.
Route 16: Forth boss battle/medallion.
Route 27: Make sure you have a Super Suit or Jet Pack to cross the lava. Use the jumping on water technique if you use the Super Suit. Dive to the bottom in the far right area of lava to get the Magic Stone.
Route Progression: 40 - 33 - 39 - 35 - 40 - 39 - 38 - 30
Route 40: Enter the tunnel (or pipe) and go right and open the door with the Magic Stone. Die immediately to the Demon, and then continue and proceed through through the cave. Use the Aqua Lung and enter the pool when you come to it. This leads to route 33.
Route 33: After talking to Guycot, and after talking to Faysha Teleport to the Hermit (on route 6 using the cross section of routes 6 and 14).
Route 35: After talking with the Hermit, teleport to the cross section of routes 40, 41, and 37. Enter route 40.
Route 40 (2): Crouch under the statue middle and use your Magic Stone to get the Sword of Apollo. Teleport to the cross section of routes 33 and 39. Enter route 39.
Route 39: Use the Sword of Apollo to kill the Demon and his eggs. You should exit the Demon cave to route 38.
Route Progression: 21 - 42 - 43
Route 21: Another (easy) boss battle.
Route 42: This is where the Jet Pack really comes in handy. Make sure you kill the stomper monster that keeps making you fall. You may have to perfect this method as he will probably still make you fall once a twice. If you kill him quick enough you will not fall. You need a Jet Pack for the next part which is to fly to the top camp above the clouds which leads to 43.
Route 43: This is where the last to battles happen and the disarming of the bomb.
Site Last Updated: February 16th, 2010
Search The Gamer's Journal: